The Feltboard Is Your Friend!
We started Michael's homeschooling with preschool at age four. Without actually thinking of using feltboards as learning aids, I made a feltboard for Michael that he loved to "play" with.
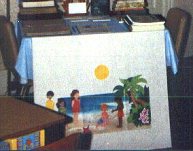
 On the right is our first feltboard! There are different-sized pencils on there that I cut out of a book and numbered from 1-5. We had loads of felt shapes that Michael liked to use to make pictures.
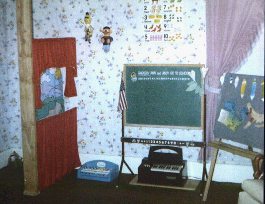 Later we moved the feltboard to Michael's room. Look at that cool puppet theatre Rich put up for us on the left. Boy does that bring back memories. We had lots of fun and laughs with that!
Let me tell you more about feltboards:
Invest in one good pair of scissors for cutting felt and then use them
only for that. I think I picked up a nice pair of Dura Shears and they
worked well. Other scissors of less quality dulled terribly when
cutting felts.
Keep a bottle of hand lotion on hand! Rough skin and hang nails (gross!) were
my worst enemy when working with felts. My little pieces would actually
catch on my hands and fly off the board. (Oh for a dishwasher!)
There are many ways to make a felt board. Try to find something
around your house that you can cover. Our very first felt board (above) was
nothing more than two pieces of posterboard taped together at the top
with masking tape. I didn't have the posterboard touching at the
top...I made approx. a 2-in. bridge from one piece to the other with the
tape - taping on both sides to cover the sticky area. Michael had an
easel and we simply threw these two pieces of "attached"
posterboard over the top with one piece hanging on one side, the other
piece hanging down the other side. At any piece goods store you can by felt
by the yard - or in a pre-packaged manner. I purchased a piece of
felt that was just about the size of those two pieces of posterboard
and it was simply thrown over the posterboard on the easel. We
instantly had a nice felt board.
We didn't have anything formal
planned. I had purchased several small sheets of different colors of
felt and cut out loads of shapes. Michael would stand at the felt board
and "design" for hours. Sometimes he tried to make real pictures like a
house with windows and trees and a sun. I had cut out lightning bolt
shapes, raindrop shapes and tree shapes as well - but mostly just plain
shapes. Sometimes he just made designs.
I found a piece of heavy cardboard from a box one day. I cut felt to
fit each side, then used masking tape around the edge to secure the felt
to the cardboard. Michael then had a lap board for working with felts.
We used this for many things - especially for spelling words with felt
letters.
He used the lap board when learning the names of the points on the Royal Rangers logo:
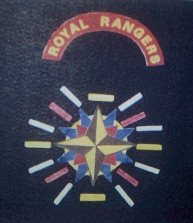 We cut this logo from the front of a T-shirt! I cut out around the words, Royal Rangers, and the star design on the T-shirt, then I glued both to a piece of felt. I then cut the two pieces out. The slips of paper at the tip of each point are simply strips cut from labels that I wrote the words on, peeled off the back of the labels, placed them onto felt, and then cut them out.
I was in the basement one day and saw that Rich had replaced some
ceiling tiles. He had one ceiling tile either left over or ready for
the trash - it didn't matter to me... the next day it had felt on one
side! I simply put the felt on one side, wrapping the edges around to
the back and used masking tape to hold it down. That ceiling tile was
the best felt board I ever had! It was lightweight and it could hold
TWO scences from the small Betty Lukens Bible backgrounds, and if I
turned it up on end...the human body felts (Betty Lukens) fit wonderfully! It was my
best board until I knocked it off the rail one day and it snapped in two
:-( . I would have made another one like it, but I still had others
:-) .
In our schoolroom, Rich put up two little ledges along two walls. One
is longer than the other. These ledges only stick out a couple of
inches, just enough for me to lean felt boards on. I've had as many as
three felt boards going at one time!
When Rich put up my big bulletin board, he used a piece of Celotex from
the lumber yard. He had to cut off one end of it so it would fit the
wall. Well, that end piece now has lovely blue felt on it and I have
the felt piece attached with music staves for teaching music (and all
the music notes and notations!).
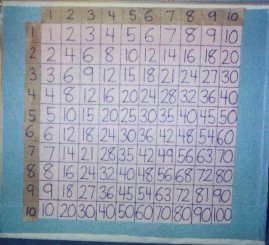
The last felt board I have is the board with my big hundred board on one
side, peach colored felt on the other side. This was a large board that
I found in Rich's "wood pile". I put elmer's glue in a bowl and really
thinned it down - I don't know what the ratio was of water to glue - I
just made a very thin glue. I used a paintbrush and brushed the entire
surface of the board with this glue and placed the felt down on it. I
put books on top and let it sit overnight. You don't want to saturate
the cloth... just enough glue to make a very thin layering. I did the same
thing to the other side the next day. The squares and numbers for my
hundred board were drawn on and marked off in pencil first, then gone
over with a permanent marker.
I don't have a clear picture of the board, this was the only one I could find:
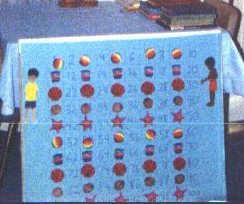 You can barely see the numbers 1-10 across the top, numbers 11-20 on the next line. I happened to have the board set up for counting by two's when this picture was taken.
I've honestly never priced a retail felt board! In our house, if it can
be picked up and moved, it just might end up with felt on it.
You could also buy one of those boards like they use at science fairs -
the ones that stand up with three sides - cover it with felt!
You could find a board and stitch two pieces of felt together like a
pillowcase to slip over the board.
It's not hard to find a way to have a felt board!
Now for some of the things we did with the board!!!!
I went to the craft store and bought as many felt squares in different
colors as my budget would allow . Michael and I also found a
closeout on some fabric paints at 25 cents each, and we bought some different
fabric ribbons out of the sale bin.
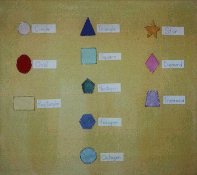
One of the first things I did was to make shapes. Isn't it interesting
that our young children are usually only asked to learn circle, square,
triangle, and rectangle. We made enough shapes to nearly fill the entire big board
- star, pentagon, hexagon, octagon, trapezoid, rhombus, and more.
Each shape was cut from a different color felt and then we put either
fabric paint around the edges to outline, or glue topped with glitter.
(Oh, this reminds me... invest in a few sheets of sandpaper, too.) I had
old file folders that were really beat up around the edges. I cut
strips out of the good middle sections and wrote the name of each shape
on a strip cut from the folder. I then cut small pieces of sandpaper to
glue onto the back of the name strip. Michael would put all of
the shapes on the board and then put the proper name underneath. Of
course, I had to read the names of the shapes to him ... but after a
while, he knew them himself:
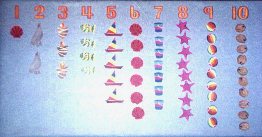
Many of you know how much I loved our Fun at the Beach set. It had a beach
scene, children, counters (buckets, seals, beach balls, starfish, boats,
etc.), numerals, fraction pieces and shapes. (You can see some of the counters on the hundred board above.) With this set and my
hundred board, we had all we needed for math!
We used the counters to learn numbers!:
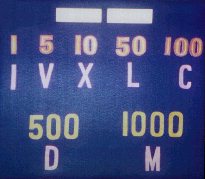
I cut out Roman Numerals from felts. We used these homemade felts exclusively with Roman
Numerals - no books. We had many more than this picture shows:
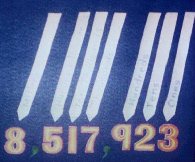
Place Value. I would put a large number up on the felt board, complete
with commas - such as 8,517,923 . I had cut strips of light-colored
felt with a point on one end - kind of in a pencil shape. On each
strip, I used a permanent marker and wrote the word of the place value -
ones, tens, hundreds, thousands, etc. I would mix these "pointer"
strips up and hand them to Michael. He would then have to place them
above the correct place value, pointing to the proper number:
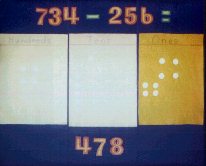
Carrying and Regrouping. Three of the store-bought squares of felt were
placed on the table in front of us. Each was a different color. I used
a permanent marker and drew a line across the top of each piece about
two inches down from the top. Above the line, each had a place value
written - ones, tens, hundreds. On the felt board on the wall, I would
use the felt numerals to show an addition or subtraction problem that
required carrying or regrouping. For example 15 + 8. I had loads of
little circles cut out. White circles for ones, pink circles for tens,
and blue circles for hundreds. Michael would count out 15 ones and put
them on the ones square. I would show him that anytime there were ten
circles on a square they would be traded for ONE ten circle. That would
be done and we would show one pink circle in the tens column and five
white circles in the ones column. Now it was time to add eight more
ones. They would be placed, he would check for ten, trade for a tens
circle, and then "see" what the final result would be -- two in the tens
column and three in the ones column - 23. We would then work it on
paper. We worked adding and subtracting like this for months - just one
or two of each a day. I kept making the numbers bigger - Michael never
had any trouble with them. He could "see" what was happening as he
carried and regrouped:
Showing multiplication:
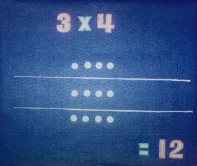
Our multiplication felt. I simply placed this over my large hundred board:
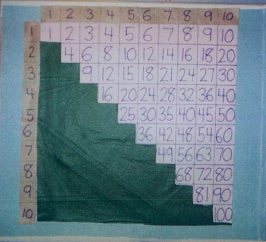
You only need to memorize half the multiplication facts!:
I have loads of pictures that we've (mostly me!) cut out of
magazines and old textbooks. We cut the fronts off of greeting cards
and Christmas cards as well. The flea market sells National Geographics
for 10 cents each. I used to get ten at a time, take the staples out
and tear them up! If there was an article I wanted, I would staple the
pages together and file it in the appropriate folder. The rest of it
would have pictures of people, places and animals cut out. My mother
would give me Good Housekeeping and lots of food pictures and silly
pictures (from ads) came out of those. Lots of these pictures had small
pieces of sandpaper glued onto the back to go on the felt board!
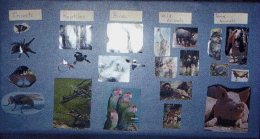
Michael would classify animal pictures on the felt board. I made the
word strips out of folders and sandpaper, and he would put them on the
board - sorting into farm animals, jungle animals, tame animals, wild
animals, birds, insects, mammals -- however I asked him to sort.
I even had an 8 1/2" by 11" photo of me when I was pregnant with Michael
- we cut it out, put little bits of sandpaper on the back - and I hung
around on the felt board for a while (no photo for that!). You can do this with teaching
family members - concepts of cousins, aunts, uncles, etc.
We had loads of Bible Story things, many of the Betty Lukens felts, we
loved the "paper" flannelgraph Pict-o-graphs that we bought at the
Gospel Bookstore. We went through all the major Bible stories with those
- we mixed them up with our Betty Lukens stuff - it was really neat.
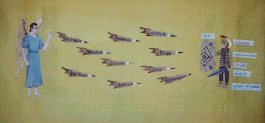 I purchased the Betty Lukens booklet that gives lessons on the Armor of God (I can't remember the name of it!) We then used Satan and a boy from our Family Worship set. We made the remainder of the materials with felt, markers, fabric paints, strips from folders, and sandpaper. We made the shield, sword, shoes, breastplate, helmet, and belt. The fiery arrows flying at the child are lying, hatred, stealing... traits of this nature.
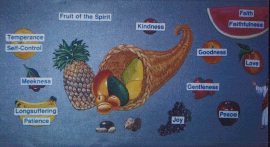 This setup was from when we were working on our Fruit of the Spirit lessons. The felts are from Betty Lukens. We used a book for lessons, which I no longer remember the exact title or author - it was something like The Holy Spirit and Your Child. It had marvelous teachings that dealt with the Fruit of the Spirit.
I would use the felt letters and put full Scriptures that Michael had to
memorize on the big board.
I tried to trace and make felts with pellon, but I found that even with
permanent markers, I had a "smearing" problem. I always waited until I
was sure the permanent markers dried on the felt pieces we made before touching
where I had used them.
There is more... but I can't think of everything we did right now. Here
are some more ideas from a book I have though:
Put objects (pictures cut from magazines?) onto the felt board. Have
your child move them around in relation to one another.... put the shoe
ABOVE the rake. Put the glass BELOW the glove. Move the plate to the
LEFT of the hat. Etc.
Cut a colorful picture into four or five parts. Show the child the
completed picture, then mix the pieces up and have your child put the
puzzle back together.
Use the felt letters to post spelling words. Or have your child use the
letters to spell the words you pronounce.
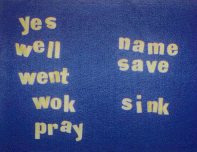 This is from one of Michael's spelling lessons. He only missed the word "walk". I suppose he was thinking about cooking when he spelled it! :-)
Cut circles and bars into equal pieces for fraction work.
Make a clock with felt hands that may be placed to show time.
This is just the tip of the iceberg of what you can do on a feltboard!
All of these things could be done on pencil and paper... but a child's
attention is held so much more when using and seeing the felt
manipulatives. I know that our felt boards have been an incredible
enhancement to our homeschool.
Try a few of these suppliers for felt materials:
Sycamore Tree - 714-650-4466 (Fun at the Beach and others)
Betty Lukens - 800-541-9279 (All Felts!)
Praise Hymn - 803-292-1990 (Music felts)
Great Christian Books probably carries some of the felts as well.
Now, go find something to put felt on! :-D
Go back to see what else I have on my web pages...
Return to our home page...
double@bright.net